Showing posts with label Holidays. Show all posts

June 25, 2017

Italian Gnocchi


Every Christmas we have single Airmen over for dinner.  Being overseas, your coworkers and friends quickly become your family.  We love this tradition and every Christmas we have a 'Theme' dinner.  We always have a traditional Thanksgiving dinner, so for Christmas we like to change it up a little.  We've had 'Felize Navidad', 'Italian Feast', and 'Comfort Food' themes.
We've had an 'Italian Feast' Christmas dinner twice out of the four years we've been stationed in Germany, due to high demand:)  People loved it and it's super easy...Pasta feeds a large number of people easily.  Being married to a 1/2 Italian, means I was blessed with being able to reach out to his great aunt for recipes on famous sauce, meatballs, and cannoli secrets.  But, I'm going to share with you my own Gnocchi recipe.  I served this our first 'Italian Feast' and it was gone by the first round of the buffet line.  So, I made plenty of it the second time I served it. 
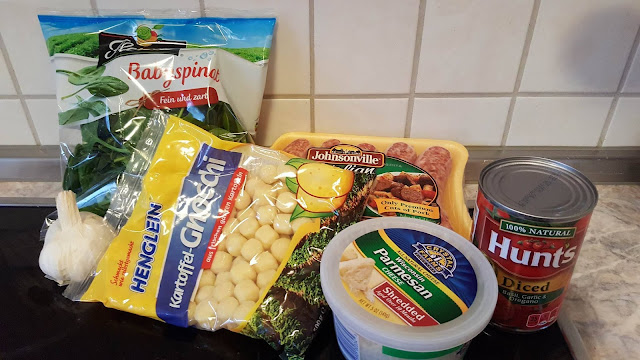
Here is what you'll need:
One bag of Gnocchi
Italian sausage links
One bag of Spinach
2-4 Garlic cloves, minced (more or less depending on your taste)
1 Can of Italian stewed diced tomatoes
Shredded Parmesan cheese
*If you are feeding a large party, then I would definitely double the ingredients.  This amount will serve 6-8 people.

Directions:
1)  Boil water in a medium pot
2)  While you wait for the water to boil, cook the Italian sausages according to the package directions (I brown the sausages on all sides in a pan on the stove top, then I add some water and cover the pan to finish cooking them through).
3)  Mince 2 cloves of garlic and sauté the garlic in a pan with extra virgin olive oil (be careful not to overcook.  Garlic burns quickly).
4)  After the garlic is slightly browned, it's time to add the spinach.  I toss an entire bag of spinach  in the pan with the extra virgin olive oil and the garlic.

5)  At this point your water should be boiling.  Add the gnocchi to the boiling water.  Stir.  The gnocchi does not take long to cook.  Keep the water at a roiling boil with the gnocchi in it.  Once the gnocchi starts to float to the top of the pot, that indicates they are done cooking.

See the gnocchi floating=done
6)  When the gnocchi is done, drain it (just like you would do pasta noodles).
7) Assemble: 
Put the gnocchi in a large mixing bowl, add the sautéed spinach/garlic
Add the Italian sausage that you've sliced up once finished cooking
Add the shredded Parmesan cheese (as much as you like)
Add the can of diced Italian stewed tomatoes, juice and all. 
The steam and warmth from the gnocchi will melt the Parmesan cheese and warm up the diced tomatoes. 
Toss it all together and serve. 

We serve ours with garlic bread and salad when it's just our family.  For our Christmas 'Italian Feast we also add bruschetta, lasagna, spaghetti and meatballs, and caprese salad.  Delizioso!

When it's all over, we play games.  Our motto is "you eat, you play".  The Airmen are usually the ones that laugh the loudest at the end of the night.  When all is said and done, I pack up leftovers in Tupperware so they have something good to eat the next day. 
Making friends your family is important, but extra consideration is made at the holidays for everyone to be able to have a home to celebrate in-wherever that home may be at the time.
Getting ready for some Pictionary!


January 01, 2017

Glühwein


If you've even traveled to Germany and experienced this country's fantastic Christmas markets (bucket list!), then you've heard of Glühwein.
My mom's first Gluhwein:)
What is Glühwein?
Glühwein is mulled wine.  Mulled wine is an alcoholic drink hot beverage that is traditionally drunk in Central Europe during the advent season, often at Christmas markets.(Wikipedia)
Basically, it tastes like a hot cider wine.

The following is entirely my own opinion about Glühwein.  Everyone has different tastes, but the following are my own suggestions and ways to make Glühweinn at home.

I have been in Germany for almost 4 years now.  I have sampled a variety of Glühwein at Christmas markets in the Rhein area.  I have found that I really do not care for the red wine Glühwein at all!  I usually have one sip and then pour it out or give it to someone else in our group to finish.  I don't know why I keep trying the red Glühwein-maybe I think that one time I'll actually like it.
I like red and white wine, so why not the red Glühwein.  I don't know.  I find it very dry and super pungent. 
I, however, LOVE the white Glühwein. 
I've tried making it a few times at home, and have found that pinot grigio is the best white wine (to my taste) for making Glühwein at home. 
I always make it on Christmas night, when we have guests over for dinner and games.  To make it super easy on myself, as the hostess, I make the Glühwein in my crockpot.  This way it stays piping hot all through the evening. 
This past Christmas was when I discovered the pinot grigeo secret:)
To make the Glühwein-you'll need one bottle of wine and the Glühwein tea bags.  I bought mine at the local grocery market "Rewe".  It's with all the teas and coffee and comes in these little packs.  There are five in a pack.  I think I paid less than 3 euro for a pack.
The directions tell you to mix about one tea bag for 3/4 bottle of wine.
It all depends on  your taste.  If you like your Glühwein to be more 'cidery' (yes, I just made up that adjective), then you could add a second tea bag to the wine.  I suggest using one Glühwein tea bag and then adding a second, after you have tasted your first batch. 
Mine ended up perfect, my best batch yet, when I used an entire bottle of pinot grigio and one Glühweintea bag.  I kept it on medium in the crockpot all evening after Christmas dinner and people just went in and out of the kitchen and ladled the drink into their mugs.  This worked out perfectly.
You can make it extra festive by using your Christmas market Gluhwein mugs
Dinner, Games, and Glühwein made for a fun filled evening.


Enjoy and please drink responsibly.


Metz France-Ice Sculptures 2017


Metz France! OO La la!

I recently went to Metz and fell in love with the area.  I took my mom to the cathedral there (you can read my post on the Cathedral here) and Christmas markets.  While walking around, we stumbled across the ice sculptures. 
We returned with my kids, the following week and walked into a (very) cold Disney wonder land.
(We went last year to the ice sculptures, which were in Belgium.  The theme last year was Star Wars-2015).  So, we knew how to prepare for the cold and what to expect.  Each year the sculpture theme changes and the location rotates throughout Europe.

This year the theme was Disney.
Maleficent

You could take your picture in Cinderella's coach.

Beauty and the Beast

I can almost hear her saying "mirror mirror on the wall.."
The dome is 1400 sqm filled with about 600 tons of ice that many talented ice sculptors formed into some of our favorite Disney characters.  This year, there was 33 sculptures-including an ice slide. 

The ice slide is great and because the dome is kept at -6C, there is no condensation at all so your toosh doesn’t get wet.  While my kids were enjoying the slide MANY times, my mom and I enjoyed a nice hot cup of hot chocolate and Gluhwein (2 Euro/each). 

We loved it and it was a great way to spend half of a day, walking around the surrounding Christmas markets and enjoying the ice sculptures.

Things to know:

Where:  Metz, France (about 1 hr. 15 minutes from Spangdahlem)


Dress:  Hats and gloves are a MUST!  My kids wear their snowsuits/pants and long johns as well.  This year we weren’t freezing, but last we froze b/c we did not know how extremely cold it would be in the dome.

-Open daily from 10am to 8pm 
-Prices:  Adults-  are 12 euro each, kids (4-11) are 8 euro each, kids under 3 are free        
-Parking:  Parking Republique is the closest, but it's only about a 10 min. walk from the cathedral.                                   
                                                                                                         

-Go during the week to avoid the crowds

April 21, 2015

Teacher Appreciation Gift

Teacher Appreciation Gift Alternative

Let’s face it-teachers have one of the toughest jobs in the world.  Hat’s off to any person that is willing to work all day shaping the minds of our little ones, staying up late grading papers, making lesson plans and updating class websites.  As well as, working weeks through the summer to set up their classroom with a fun and interesting theme to inspire their students.
Teacher Appreciation week is a great time to thank your child’s teacher or daycare provider.  If you can’t do something small each day of the week, then doing something at least one day of the ‘appreciation week’ is well received. You could even do an end of the year gift for your child's teacher.
My sister is a teacher and she appreciates getting gift cards-to anywhere, really.  Getting USEFUL gift cards is great, such as:  Michael’s arts and crafts, Paneras, any restaurant, etc. 
If you want to do something more personalized, you can always help your child make a sweet gift.  Pinterest has a ton of ideas!  But, you can also put together a themed gift.  Gourmet coffees with a travel mug is always nice, when you include a hand written note from the student with it. 
Last year my son had a male teacher and he was AMAZING!  I looked to Pinterest to help me find a ‘manly’ teacher appreciation gift and didn’t find anything really great…it seemed like many gift ideas included beer or were kind of cheesy.
So, I took it upon myself to make a gift basket that I was hoping would be useful and fun at the same time. 
I went to a local store in my village (yes, I said village-we live in Germany and there are little towns everywhere and the locals call them villages) and bought a plastic bin and some color coordinating ‘grilling equipment’, such as:  rubber pot holders, marinating brush, and spatula.  I then went to the store and purchased a few nice BBQ spice rubs and sauces to include in the gift basket as well.  I had my son write his teacher a card to top off the gift baskets contents. 
I LOVED how this turned out and even better…his teacher said that he grills EVERY Sunday afternoon, even in the snow, and that this was the perfect gift for him.  I was thrilled that is was received so well and really enjoyed hunting for the perfect items to include in this teacher appreciation gift for my son’s wonderful teacher! 
Hope this inspires you to think outside of the box and find that personalized gift for your child’s teacher-they deserve it. 

December 09, 2012

Snowmen Milkjugs

So, it's wasn't even December and my kids were itching to get into the Christmas Spirit. 
I am loving this, because I am a Christmas gal...but even more, Christmas is totally my husband's holiday.  He loves decorating the second Thanksgiving is over.  For this, I AM THANKFULL.

Something I saw on Pinterest was a cute little idea for a lit up milk jug decorated like snowmen. 
I had 'pinned' this idea weeks ago so had already cleaned and dried out 2 milk jugs for my kiddos. 

I got out the glue, construction paper, and safety scissors and let them have at 'em.  My 3 year old little a little help with the cutting out of specific shapes, per her instruction:)
I put my OCD mommyness away and let my kids create their masterpieces anyway they wished.  They turned out super cute. (yes, I am biased)

Here is what you'll need:
glue
colored construction paper
one milk jug per child
one string of holiday lights per milk jug
scissors

-First get ahold of your empty milk jugs.  one per child.  clean and dry them. 
I just put a little dawn dish liquid in the empty milk jug, fill with a little hot water, put the top back on, and shake shake shake.  Then I empty the water down the drain and sit it upside down in my dish drying rack over night.  Done!

-Before starting the project, take some sharp scissors or a knife and cute a whole in the back of the milk jug big enough for the string of lights to be put through and into the jub.

-Lay out your supplies and let the kids cut and glue their shapes out of construction paper to reveal their 'faces' on the milk jugs. 
 

-Allow the glued faces to dry and then put your string of lights inside the milkjug.  Make sure to remember to leave the 'teeth' end of the plug out to be plugged in.  (you don't want to fish the string of lights into the jug and then go to plug it in and realize you put the 'teeth' end of the lights in first and now cannot plug the lights in.
 You can put these little guys anywhere you wish.  I've seen them as part of fronth porch and yard decorations for Christmas.  We decided to use then in the kid's rooms as additional festive night lights for the holidays. 

*My husband and I always unplug the lights before we go to bed in case of a fire.  The jugs do get warm but not necessarily hot.  We just unplug them as a preventative measure.

Happy Decorating!

February 14, 2012

Valentines Day Foods for Kids

Last year I made a Valentines day themed meal for breakfast, lunch, and dinner.  I think I had as much fun making them for the kiddos as they had eating them. 

On the menu:
Breakfast:  Heart shaped pancakes (I used a heart cookie cutter to execute the perfect shape out of a regular pancake)  and strawberries with whipped cream (not pictured)


Lunch:  Heart shaped grilled cheese & tomato soup


Dinner:  Heart Pizza

(All served on Valentines place mats I made out of cardstock and clear page protectors.)

I'm still thinking of things to do for this year Valentines Day to make it special for the kids.  I picked up a few goodies at Walmart.  Now, it's just planning the menu. 
What will you be doing to make this day of celebrating love for one another special?

December 29, 2011

What we got for Christmas

On the first day of Christmas winter brought to me:  2 kids with bronchitis, 1 child with the flu too, myself with bronchitis, countless sleepless nights, 18 loads of laundry, and a new puppy too.

My son said it best in the middle of one of his puke fests, "mama, this is going to be a terrible Christmas."
We didn't do any of the things we normally do for the holidays because we were all sick. (this is except for my super immune system husband who rarely gets ill). 
We had no egg nog in the house, no sugar cookies were made, no reindeer food put out for Santa to rest his sleigh when dropping off our presents, and no trips around the neighborhood to ooh and ahh at all the lights. 
We were on pure survival mode. Which included a nebulizer for my daughter that we have to do 4 times a day.  Let me tell you how fun that is to get a 2 year old to sit still for 10 minutes during each treatment.
We did however, get around to decorating our new puppy's living space under the stairwell.  We only had energy to color some pictures for her.  Hopefully, when things settle down we will be able to make her a little name sign, etc.  This helped get the kids excited and started their contribution to the dog that (after many name changes) was deemed "Holly" since we got her around the holidays. 


December 23, 2011

Relishing the Family Moment

At Christmas time, traditions begin...making sugar cookies together, going out and cutting down the Christmas tree, driving around the neighborhood and looking at lights with Christmas music playing, etc.

This was our second year decorating a ginger bread house.  This years house was a kit from the craft store and was made out of styrofoam.  I hot glued the house together and let the kids have at it with the foamy decorations. 
In the midst of decorating I found my OCD tendencies start to come out.  I was secretly correcting the kids placements of their stickers, etc.  I had to stop myself and step back.  I realized the more the ginger bread house was decorated solely by my children, the more precious it would be... no matter what it looked like in the end. 
So, this Christmas season I am reminded to live in the moment and relish these precious family times together creating traditions...not trying to make them perfect. 
Because after all, have you ever seen a more gorgeous ginger bread house?

December 19, 2011

A New Kind of Cookie For Santa

Peanut Butter Rice Krispie Cookies
Families love leaving cookies and milk out for Santa.  Here is a quick and easy recipe for Peanut Butter Rice Krispie Cookies.  They are super easy and require no baking.  They take about 10 minutes and only 4 ingredients! 

Here is what you'll need:
1/2 Cup honey/Karo syrup
1/2 Cup brown sugar or white sugar
1 Cup peanut butter (crunchy or creamy is your own preference)
2 Cups Rice Krispies

Directions:
In a medium pot on medium/low heat, stir together honey and sugar.  Stir until mixed and it starts to boil.  As soon as you see bubbles around the edges of the pot, turn the heat off. 

Add the PB and stir until all is mixed and smooth.  Add the Rice Krispies and gently mix all ingredients together.  Place small spoon fulls of cookie mixture onto laid out wax paper and let cool to set. 
DONE!
They are not pretty by any means.  But, they are a great boost of energy for Santa to finish his night delivering presents for good little boys and girls. (and a good source of protein for your kids for a sweet snack).

December 16, 2011

Baby Jesus Ornament

This month I'm blessed with doing the Christmas crafts for the kids in Sunday school at church.  Christmas Crafts-YES!!!
This past week we made super simple baby Jesus tree ornaments. 
Here's what you'll need to make one:
A small paper plate
Stapler
Simple drawing of a face (resembling a baby as much as you can artistically accomplish)
Christmas Bible verse sticker, or you can write the verse on the front or back of the ornament (We used Isaiah 9:6)
Hole puncher
String/yarn

Directions:
~Punch a hole in the top of the plate with your hole puncher.
~Fold the bottom of the paper plate about 1/3 of the way up. 
~Fold both sides in and staple the folded sides down.
~Glue the baby Jesus' face near the top of the plate so that Jesus looks tucked in swaddled clothes.
~Pull your yarn/string through the hole punched into the top of the plate and tie at the top.
~Place your Bible verse sticker on the ornament or write the Bible verse on the back of the ornament

I got to make this ornament with my son and had a blast with him and all the other children.  I was delighted when my daughter also got to make one in her class during Sunday school.  My heart melted when she came running out of the class carrying her ornament saying "Wook, Baby Jesus!"

December 11, 2011

Homemade Chocolate Truffles

The perfect chocolaty treat for the holidays!
Homemade chocolate truffles
Here is the recipe:
Ingredients:
2 1/2 packages (20 squares) Bakers semi-sweet chocolate
1 package (8 oz) cream cheese, softened
Decorations:  chopped peanuts, colored sugar sprinkles, cocoa powder

Directions: 
Melt 8 chocolate squares in pot on stove top (or microwave).  Beat cream cheese with mixer until creamy.  Blend in melted chocolate.  Refrigerate until firm.
Shape into small balls.  Place on waxed paper covered baking sheet.
Melt remaining chocolate squares.  Use a fork to dip truffles; return to baking sheet.  Decorate, then refrigerate for 1 hour. 
dipping the formed truffles into the melted chocolate
This is a recipe that I have had in my recipe box for years but have never had the gumption to try.  This year I went for it and although they have been a hit, I don't know if I'll do it again.
Here's the thing...it states that it'll make 36 balls.  I followed the directions to a T and I guess I made mine too big (slightly smaller than a golf ball each) because I only got about 20.  My main problem was the shaping of the truffles, because no one wants to eat a home made gift that looks like a hot mess.  So, this took awhile to get the shape correct without melting the chocolate truffles in my hands during the process.  It got messy!  Also, the directions say to use a fork when dipping the truffles in the melted chocolate.  It really was not functional to work this way because the truffle's chocolate on the outside was getting damaged.  So, instead I used appetizer spears and anchored them in styrofoam. 


But when all was done, they looked and tasted great.

I put the truffles in holiday tins from the dollar store and used some tissue paper and a little sticker note from scrap booking material for the inside to add to the presentation.

December 03, 2011

How to Make Your House Smell Like Christmas

There have been quite a few tricks to try to make a house smell yummy and get one in the Christmas spirit.  There are great air freshener sprays, scented candles and aroma melts, and even plug in room fresheners that do a great job.
There is also a trick of simmering some drops of vanilla in a small amount of water on the stove top along with a few sticks of cinnamon.
What I have found to work best is simmering a pot of water with 'Christmas' potpourri.  This fills the house quickly with the wonderful smell of pine and cinnamon (mostly cinnamon with a pinch of ginger).  It is a quick way to fill your house before guests arrive with the Christmas spirit or just to have your house begin to feel a lot like Christmas.
I've had a small pot on my stove for the past 3 days and just turn it on whenever we want that smell in the house.  We also have a live Christmas tree up in the house that smells wonderfully pine'y' but the potpourri adds that extra cinnamon in the air. 
Merry Christmas!
Related Posts Plugin for WordPress, Blogger...