Showing posts with label recipes. Show all posts

June 25, 2017

Italian Gnocchi


Every Christmas we have single Airmen over for dinner.  Being overseas, your coworkers and friends quickly become your family.  We love this tradition and every Christmas we have a 'Theme' dinner.  We always have a traditional Thanksgiving dinner, so for Christmas we like to change it up a little.  We've had 'Felize Navidad', 'Italian Feast', and 'Comfort Food' themes.
We've had an 'Italian Feast' Christmas dinner twice out of the four years we've been stationed in Germany, due to high demand:)  People loved it and it's super easy...Pasta feeds a large number of people easily.  Being married to a 1/2 Italian, means I was blessed with being able to reach out to his great aunt for recipes on famous sauce, meatballs, and cannoli secrets.  But, I'm going to share with you my own Gnocchi recipe.  I served this our first 'Italian Feast' and it was gone by the first round of the buffet line.  So, I made plenty of it the second time I served it. 
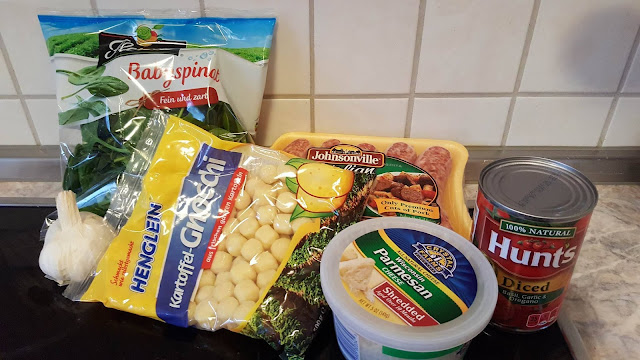
Here is what you'll need:
One bag of Gnocchi
Italian sausage links
One bag of Spinach
2-4 Garlic cloves, minced (more or less depending on your taste)
1 Can of Italian stewed diced tomatoes
Shredded Parmesan cheese
*If you are feeding a large party, then I would definitely double the ingredients.  This amount will serve 6-8 people.

Directions:
1)  Boil water in a medium pot
2)  While you wait for the water to boil, cook the Italian sausages according to the package directions (I brown the sausages on all sides in a pan on the stove top, then I add some water and cover the pan to finish cooking them through).
3)  Mince 2 cloves of garlic and sauté the garlic in a pan with extra virgin olive oil (be careful not to overcook.  Garlic burns quickly).
4)  After the garlic is slightly browned, it's time to add the spinach.  I toss an entire bag of spinach  in the pan with the extra virgin olive oil and the garlic.

5)  At this point your water should be boiling.  Add the gnocchi to the boiling water.  Stir.  The gnocchi does not take long to cook.  Keep the water at a roiling boil with the gnocchi in it.  Once the gnocchi starts to float to the top of the pot, that indicates they are done cooking.

See the gnocchi floating=done
6)  When the gnocchi is done, drain it (just like you would do pasta noodles).
7) Assemble: 
Put the gnocchi in a large mixing bowl, add the sautéed spinach/garlic
Add the Italian sausage that you've sliced up once finished cooking
Add the shredded Parmesan cheese (as much as you like)
Add the can of diced Italian stewed tomatoes, juice and all. 
The steam and warmth from the gnocchi will melt the Parmesan cheese and warm up the diced tomatoes. 
Toss it all together and serve. 

We serve ours with garlic bread and salad when it's just our family.  For our Christmas 'Italian Feast we also add bruschetta, lasagna, spaghetti and meatballs, and caprese salad.  Delizioso!

When it's all over, we play games.  Our motto is "you eat, you play".  The Airmen are usually the ones that laugh the loudest at the end of the night.  When all is said and done, I pack up leftovers in Tupperware so they have something good to eat the next day. 
Making friends your family is important, but extra consideration is made at the holidays for everyone to be able to have a home to celebrate in-wherever that home may be at the time.
Getting ready for some Pictionary!


February 11, 2017

Yummiest Chocolate Cookies Ever

If you are looking for a quick and easy recipe-look no further.
If you are looking for quick, easy, AND THE BEST CHOCOLATE cookie recipe EVER-here ya go!

My friend always treated us with these fantastic chocolate cookies when she would come over.  They were literally the best cookies I've ever tasted! 
I finally decided to try my hand at making them and now we are addicted. lol
It only takes 3 ingredients!  THREE!!!!!

1 box chocolate cake mix
2 eggs
1/2 Cup vegetable oil
Bake 325 for 8-10 minutes

That's it!

Mix the three ingredients to get sort of like a thick brownie consistency.
Put small spoonfuls onto an ungreased cookie sheet.  Because of the vegetable oil, the cookies sort of form perfectly into these little dollops.
Bake for about 8 minutes to ensure they are super soft all over...10 minutes for them to still be soft in the middle, but have a little harder perimeter.
I like them all being chocolate, but my kids and hubby love adding peanut butter.  So, I make half the batch with peanut butter chips.
Bake them the exact same way...325 for 8-10 minutes...8 minutes for more of an overall soft cookie.


Told ya it would be the easiest recipe ever!
ENJOY!!!!!!!!!!!!!!


January 01, 2017

Glühwein


If you've even traveled to Germany and experienced this country's fantastic Christmas markets (bucket list!), then you've heard of Glühwein.
My mom's first Gluhwein:)
What is Glühwein?
Glühwein is mulled wine.  Mulled wine is an alcoholic drink hot beverage that is traditionally drunk in Central Europe during the advent season, often at Christmas markets.(Wikipedia)
Basically, it tastes like a hot cider wine.

The following is entirely my own opinion about Glühwein.  Everyone has different tastes, but the following are my own suggestions and ways to make Glühweinn at home.

I have been in Germany for almost 4 years now.  I have sampled a variety of Glühwein at Christmas markets in the Rhein area.  I have found that I really do not care for the red wine Glühwein at all!  I usually have one sip and then pour it out or give it to someone else in our group to finish.  I don't know why I keep trying the red Glühwein-maybe I think that one time I'll actually like it.
I like red and white wine, so why not the red Glühwein.  I don't know.  I find it very dry and super pungent. 
I, however, LOVE the white Glühwein. 
I've tried making it a few times at home, and have found that pinot grigio is the best white wine (to my taste) for making Glühwein at home. 
I always make it on Christmas night, when we have guests over for dinner and games.  To make it super easy on myself, as the hostess, I make the Glühwein in my crockpot.  This way it stays piping hot all through the evening. 
This past Christmas was when I discovered the pinot grigeo secret:)
To make the Glühwein-you'll need one bottle of wine and the Glühwein tea bags.  I bought mine at the local grocery market "Rewe".  It's with all the teas and coffee and comes in these little packs.  There are five in a pack.  I think I paid less than 3 euro for a pack.
The directions tell you to mix about one tea bag for 3/4 bottle of wine.
It all depends on  your taste.  If you like your Glühwein to be more 'cidery' (yes, I just made up that adjective), then you could add a second tea bag to the wine.  I suggest using one Glühwein tea bag and then adding a second, after you have tasted your first batch. 
Mine ended up perfect, my best batch yet, when I used an entire bottle of pinot grigio and one Glühweintea bag.  I kept it on medium in the crockpot all evening after Christmas dinner and people just went in and out of the kitchen and ladled the drink into their mugs.  This worked out perfectly.
You can make it extra festive by using your Christmas market Gluhwein mugs
Dinner, Games, and Glühwein made for a fun filled evening.


Enjoy and please drink responsibly.


November 23, 2014

Chicken and Red Onion Skewers

This has got to be one of the easiest, quickest, and surprisingly tasty grilled recipes ever.
Ingredients:
3 Chicken Breasts (cut into large chunks)
Red Onion
Bacon
That right folks, only 3 ingredients!  Told ya it was gonna be easy;)
Sweet chili sauce (optional if you want a little zing to your chicken)
*Skewers and a zip lock bag

The first step of this recipe is to cut your chicken breasts into desired sizes for skewering.  Make sure they are not too thick so that they can be grilled faster and thoroughly (no one wants salmonella at a cookout).  Put those chicken chunks into a gallon zip lock baggie and pour approximately 1 cup of Ranch dressing into the baggie with the chicken.  I added a little bit of sweet chili cause, about a Tablespoon, to my baggie along with the Ranch dressing for a little kit.  I have 2 kiddos and the kick of the sweet chili sauce was not too much for them and it was nice and zesty.
Here is where you have an option of marinating the chicken or not.  On those weeknights that you do not have time, no marinating is required for this chicken to be delicious.  However, I marinated mine for about 2 hours once and the chicken was extra yummy and moist.
After you put the chicken chunks, Ranch dressing, and sweet chili sauce into your zip lock baggie-make sure it is sealed really well.  Then shake and roll!  If you have little ones, they might have fun getting all that chicken coated with the Ranch mixture.  In the meantime cut a red onion into large chunks (not slices-you need some onion bulk to actually skewer).
Once the chicken is coated, stab the chicken onto a skewer.  Then add a large chunk of red onion and then a piece of bacon.  For the bacon, I used those wonderful precooked bacon slices you can get in the refrigeration isle at your grocery store.  They are already cooked and all you have to do is cut each slice in half for the skewering.  The grill does all the rest for you.  Fold a piece of bacon, that has been cut in half, like an accordion to really get good onto the skewer.
I used metal skewers.  If you use bamboo skewers, make sure to soak them in water prior to adding your ingredients to prevent the skewers from burning.

So, chicken->red onion->bacon.....and....repeat.  Then grill those puppies up and that's IT!!!!
I paired mine with sliced potatoes coated with extra virgin olive oil and garlic salt that I grilled as well. 
YUMMY!

June 10, 2013

Dinner in a Pouch

We are currently in transition waiting to move into our house in Germany.  We are a family of 4 living in a tiny one bedroom German apartment.  It's functional but small. I've been trying to figure out some simple and healthy dishes to fix so we can stop living off of microwavable foods.:)

After searching Pinterest for inspiration I came up with what I like to call "Dinner in a pouch."  I used to work at a Ranch and we made something similar to it...potatoes, onion, carrots, and ground seasoned beef in a tin foil pouch cooked over a campfire. 

This version is slightly healthier.
Here is my German kitchen to cook in. 
I have 2 pots and one pan, but no cookie sheet so tin foil has become my best friend.
Here is what you'll need:
tin foil
bell peppers (how many and which kind is your preference)
onion
polish sausage
mushrooms
zucchini
salt and pepper and whatever additional seasonings you want
(I made a tin foil pouch, one per person).

Take a medium sized piece of tin foil and lay it out on your counter.  Make sure you give yourself extra on the edges to fold in and create a seal (this will be more clear as you read on).  Cut your bell pepper, sausage, onions, and mushrooms and place them on the tin foil.  The size and amount of veggies and meat is completely up to you. You can also add different veggies than the ones listed-be creative since you will be the one eating it.

You will not need to spray the tin foil with pam or anything to prevent sticking.
Season the meat and veggies with salt and pepper and any other seasonings you want.  I also used garlic salt and a little Italian dressing.  Tear a second piece of tin foil the same size as your base tin foil and place it on top.  Fold the sides of the tin foil in to create a seal.  Place in the oven and cook for about 30 minutes on 350 degrees. 
BE CAREFUL when you open the pouches to check on their progress and when opening to eat due to steam escaping.  You can eat it right out of the tin foil or put it on a plate and serve with rice.  Very yummy!
So, whether you live in a tiny apartment or want something good to eat while camping, this is a great dish to enjoy.

December 22, 2012

People Puppy Chow

So, I have heard of making this recipe for years but always thought it looked gross.  People rave about it, but it looked too messy to make. 
However, today I got an itch to make a new snack for the kiddos and I had all the ingredients in my pantry.
So, what the heck!  Here goes...

What you'll need:
6 C Crispix cereal (I used corn chex cereal)
1/2 C peanut butter
1 C chocolate chips
1/4 C butter
1-2 C powdered sugar

The recipe I tried said to microwave the PB, Butter, and chocolate chips in the microwave for 2-3 minutes stirring once during microwaving(is that even a word?).  Other recipes said to melt the PB, butter, and chocolate chips all together on the stovetop.  I did the microwave b/c it was faster.  It seemed to work out fine with the microwave. 
While the microwave was going, I measured out the 6 Cups of chex into a large bowl and put the powdered sugar in a large gallon ziplock bag. 


I poured the melted PB, butter, and chocolate chips over the chex and gently stirred with a rubber spatula.  GENTLY stirring is the key and it actually took alot more stirring than I thought to get all the chex evenly coated. 
Then I scooped all the covered chex into the ziplock bag with the powdered sugar.  It fit perfectly!  Seal the bag and gently shake so they are all covered with white sugary goodness. 

Then pour the mixture onto wax paper or a cookie cooling rack. 
Wait till they dry and then serve.  Store in an airtight container.

It was suprisingly easy and really not messy at all.  I think I might actually make it again, that is if the kids like it.  They are still napping:)


May 25, 2012

Spruce up your popcorn


For a treat I like to add little sweets to my kid's popcorn.  It's especially fun on friday night movie nights:)
I give everyone their own dixie cup of popcorn.  You can really choose from almost anything to top your popcorn with.
peanuts
marshmallows
M & M's
gummy bears
swedish fish
chocolate chips
skittles
raisins
yogurt covered raisins
dried cranberries

On this night I picked gummy bears, yogurt covered raisins, and mini marshmallows for our popcorn toppings.  It's just a way to change things up once in awhile.


April 29, 2012

Homemade Dill Dip

If you have kids you probably have noticed that they love to dip foods.  Even if it is a food that they particularly do not like...throw in some ranch or ketchup to dip it in and the plate is cleaned. 
My kids love dill dip.  In fact the entire family does.  We use it for dipping pretzels, carrots, cucumbers, raw broccoli...if it's dill dipable, we dip it.

April 15, 2012

Colored Cakes

One of the sweet pregnant gals in my Bible study small group was going to find out if she was having a boy or a girl and I thought we would celebrate the news.  So, I made a pink and blue layered cake to enjoy while mooning over her prego belly and diving into our Beth Moore books.
It's very simple to do.
I used a white cake mix so that my colors would turn out just the way I wanted them.
Make the cake batter exactly the way the box directions tell you to for two 9 inch round cake pans.  Before pouring the batter into the prepped cake pans, divide it in half.  Take some red food coloring and add just a few drops to one of the batters and mix-this will make you pink layer.  Take blue food coloring and add just a few drops to the other batter half and mix.  It's always best to add too little at first and mix and then add more coloring.

 Here is the gradual coloring to make pastel pink
After you have your desired color of batter (I wanted pastels so it didn't take much) pour the batter into the prepared cake pans and bake according to box directions. 

When they are fully baked and cooled, put the layered cake together like any other.  I used white icing. 
Here is what it looked like after the reveal.


For my son's 4th birthday he asked for rainbow cupcakes.  I did not take pictures of the process but here is what it turned out looking like.


We all loved them and they were so yummy.  My son definitely enjoyed them. 
To make these lovely rainbow cupcakes all you have to do is prepare the cupcake batter per the box directions.  Then decide what colors you want to use for your 'rainbow'.  Divide the batter equally into bowls that coordinate per color.  For example:  if you want 5 colors in your 'rainbow' cupcakes then you will need 5 bowls, each filled with the same amount of cupcake batter.  Use food coloring to make your desired colors.  Just put a few drops of the preferred color into each bowl of batter and mix.  Once you have your batter prepared to the color that you desire, just fill the cupcake tins.  It works best to use measuring spoons or 1/4 C measuring cup to make sure the colors are around the same amount per cupcake.  Simply layer the different colors in the cupcake tins and bake according to the package. 
Don't worry about colors running and not turning out well.  You can almost not mess this up.  It also helps if after you fill all the tins with the first color of batter, to tap your tins to get the batter to settle evenly.  Do this between each color that you add to the cupcake tins.  I used white icing to top off my son's birthday cupcakes and they looked great!

April 01, 2012

Homemade Pizza with the Kids

One of my favorite things to do is have the kids help me cook.  What's that saying...if you let your kids help cook they are more likely to eat it.  Well, not in my kids case.  But, we have a good time preparing the food together anyway. 
Here is how my munchkins make their own personal pan pizza. 
I make the pizza crust dough in my wonderful bread machine that I cannot live without.

Recipe for 1.5 lbs homemade pizza crust in the bread machine:
1/2 tsp salt
3 C all-purpose flour
1 1/2 tsp active dry yeast
1 C water
2 Tbsp. olive oil or vegetable oil
Add all lingredients, liquid first, to bread machine per instructions.
Love this recipe b/c you don't have to have bread flour and it takes like 45 minutes to make.

When the pizza dough is done in the bread machine, I grease the bottom of 2 round cake pans and spread out the dough in each.  (One pan with dough for each kid).  I put the mozzarella cheese and pizza sauce in their own kid friendly small bowls and give the kids a spoon and tell them to have at it.

I love how my son sneaks in a spoon of marinara sauce.  Yum!  I can't blame him and the whole point is to have fun and feel creative.


Smiles of delight make it all worth it. 


Bon Appatite!

March 20, 2012

Pizza Pockets

I thought I would change things up for dinner and make homemade pizza pockets. 
Here is what you'll need: 
One tube of Pillsbury pizza crust
Fixings for pizza:  Mozzarella cheese
                              Pizza sauce ( I just used jarred marinara sauce)
                              Pepperoni, etc.

I rolled out the pizza crust on my floured counter top to get more out of my buck.  I took a pizza cutter and cut out 4 oblong triangles.  One for each person.  Then I filled my dough triangles with my pizza fixings.  Be sure to not over stuff. Then I folded my triangles over and pinched the edges closed. they are not pretty, but taste yummy).
 Cook according to Pillsbury pizza dough direction. 
                       

The shape made for easy dipping in ranch dressing for my son. 

Yum!

March 08, 2012

Crockpot BBQ Chicken...oh, the possibilities

What is easier than throwing chicken in a crockpot with some BBQ sauce in the morning and having a delicious dinner a few hours later?  Nothing!:)
I've recently become addicted to making BBQ chicken in the crockpot, because it is so easy and you can make so many things with it and it also freezes well.
Here is what you'll need:
~crock pot
~chicken-any chicken will do fine.  If it is frozen you can still cook it in the crockpot, it just needs to be on low and cook for about 6-8 hours.  If it is already defrosted, then you can cook it on high for 3-5 hours (depending on how much chicken you stuff into the crockpot)
~BBQ sauce of your choice

Pour some of the BBQ sauce into the bottom of the crockpot to prevent sticking

Put your chicken in the crockpot and cover with remaining BBQ sauce.  You can be as liberal with the sauce as you want.  It's all up to you and your taste and preference.


Cover, and cook on low for 3-5 hours.

When it's done it'll look something like this:  Just look at how tender the chicken it.  It is literally falling apart when I pick it up with the tongs.


Look at how much BBQ chicken I got from this dish

Let is cool and the pick the chicken off the bone, if you are not using boneless chicken breast.  It is so juicy that you really do very little picking, but rather pulling.
You can freeze the BBQ chicken after you pick it in zip lock bags.  Make sure to date and label it if you are freezing it for later. 
We made loaded baked potatoes with our BBQ chicken.  Just microwave a baked potato, add cheddar cheese, salt and pepper, the BBQ chicken, and top with sour cream.  Yummmmm!

I also made these delicious and low fat wraps.  My husband loves them for his lunch at work. 

To make the wrap I put the BBQ chicken, diced red onion, some cheddar cheese, and cilantro on a wheat tortilla. 


To make it look nice and keep it together I wrap it up in parchment paper and cut it on a diagonal and place it in a gladware container. 


Super healthy, easy, and way delicious!
Related Posts Plugin for WordPress, Blogger...